Monday, January 30, 2012
african themed jewelry | Go to post ➜
I'm always on the lookout for new stampings and crystals - and I managed to get these gorgeous safari-themed pieces a few weeks ago. Some fiddling and many, many Lion King songs later:

Zebra stampings with a Swarovski Crystal called Chilli Pepper. It's about as hot as it sounds, all spicy reds and oranges tinged with gold ♥ I love how the curve of their necks forms a sort of heart :)
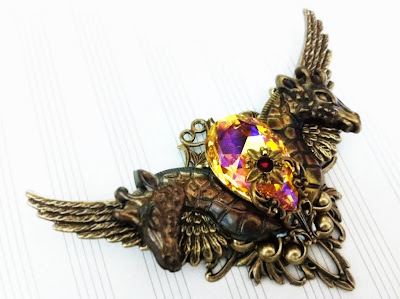
Giraffe stampings with a Swarovski Crystal called Brandy. This one blazes like an African sky, all purple and gold and indigo...
... I need to stop mooning over colours like that. Anyway. Neither of these are actually ready to be put up for sale, just thought I'd share a sneak peek here. I realise I post more unfinished and never-to-be-finished work up here than actual pieces, but since this blog is more of a behind the scenes kind of thing, I hope no one minds.
For actual finished pictures and proper descriptions, head over to ValkyrieCouture on Etsy or my DA account. :) I should mention that I'm holding a 20k pageview kiriban giveaway on my DA - that is, the person who catches the 20,000th pageview and sends a screen shot to me wins a free pair of ear cuffs like these:

I've got a lot more designs in addition to these three (10 in total, I think) - head over to the ear cuff section on my Etsy to check out what you can win :)
♥ JasmynLabels: available, filigree, necklace, ValkyrieCouture, WIP
10:51 AM
Monday, January 30, 2012
african themed jewelry | Go to post ➜
I'm always on the lookout for new stampings and crystals - and I managed to get these gorgeous safari-themed pieces a few weeks ago. Some fiddling and many, many Lion King songs later:
Zebra stampings with a Swarovski Crystal called Chilli Pepper. It's about as hot as it sounds, all spicy reds and oranges tinged with gold ♥ I love how the curve of their necks forms a sort of heart :)
Giraffe stampings with a Swarovski Crystal called Brandy. This one blazes like an African sky, all purple and gold and indigo...
... I need to stop mooning over colours like that. Anyway. Neither of these are actually ready to be put up for sale, just thought I'd share a sneak peek here. I realise I post more unfinished and never-to-be-finished work up here than actual pieces, but since this blog is more of a behind the scenes kind of thing, I hope no one minds.
For actual finished pictures and proper descriptions, head over to ValkyrieCouture on Etsy or my DA account. :) I should mention that I'm holding a 20k pageview kiriban giveaway on my DA - that is, the person who catches the 20,000th pageview and sends a screen shot to me wins a free pair of ear cuffs like these:
I've got a lot more designs in addition to these three (10 in total, I think) - head over to the ear cuff section on my Etsy to check out what you can win :)
♥ Jasmyn

Zebra stampings with a Swarovski Crystal called Chilli Pepper. It's about as hot as it sounds, all spicy reds and oranges tinged with gold ♥ I love how the curve of their necks forms a sort of heart :)

Giraffe stampings with a Swarovski Crystal called Brandy. This one blazes like an African sky, all purple and gold and indigo...
... I need to stop mooning over colours like that. Anyway. Neither of these are actually ready to be put up for sale, just thought I'd share a sneak peek here. I realise I post more unfinished and never-to-be-finished work up here than actual pieces, but since this blog is more of a behind the scenes kind of thing, I hope no one minds.
For actual finished pictures and proper descriptions, head over to ValkyrieCouture on Etsy or my DA account. :) I should mention that I'm holding a 20k pageview kiriban giveaway on my DA - that is, the person who catches the 20,000th pageview and sends a screen shot to me wins a free pair of ear cuffs like these:

I've got a lot more designs in addition to these three (10 in total, I think) - head over to the ear cuff section on my Etsy to check out what you can win :)
♥ Jasmyn
Labels: available, filigree, necklace, ValkyrieCouture, WIP
10:51 AM
Tuesday, January 24, 2012
| Go to post ➜
Just a couple of quick shots, because I'm getting buried under college work and a week-long fever. -pathetic sniffling-
Christmas favors for my friends - Christmas isn't really a big thing in Singapore compared to other holidays like Chinese New Year, so we didn't even have Christmas dinner... Or much in the way of presents, just souvenirs from my trip to Paris and a ring, with heart-shaped tags and ribbon.

And, my new business cards just arrived! They're gorgeous, and I'm quite annoyed with myself for not having done this earlier. There are also "coupon code" cards that I send out with all purchases, containing a discount code for return customers :)

In other news, I've put one of my Etsy shops (Sodacrush) on hiatus because I just can't spare the time I need to edit listings and all that. BUT, to make up for it, I'm having a 50% sale on some of the items in my other shop, ValkyrieCouture.

Check out the new sale section here! All items at 50% (or more) off, and I'll be adding new sale items from time to time.
♥ JasmynLabels: available, business cards, filigree, necklace, ValkyrieCouture
3:21 AM
Tuesday, January 24, 2012
| Go to post ➜
Just a couple of quick shots, because I'm getting buried under college work and a week-long fever. -pathetic sniffling-
Christmas favors for my friends - Christmas isn't really a big thing in Singapore compared to other holidays like Chinese New Year, so we didn't even have Christmas dinner... Or much in the way of presents, just souvenirs from my trip to Paris and a ring, with heart-shaped tags and ribbon.
And, my new business cards just arrived! They're gorgeous, and I'm quite annoyed with myself for not having done this earlier. There are also "coupon code" cards that I send out with all purchases, containing a discount code for return customers :)
In other news, I've put one of my Etsy shops (Sodacrush) on hiatus because I just can't spare the time I need to edit listings and all that. BUT, to make up for it, I'm having a 50% sale on some of the items in my other shop, ValkyrieCouture.
Check out the new sale section here! All items at 50% (or more) off, and I'll be adding new sale items from time to time.
♥ Jasmyn
Christmas favors for my friends - Christmas isn't really a big thing in Singapore compared to other holidays like Chinese New Year, so we didn't even have Christmas dinner... Or much in the way of presents, just souvenirs from my trip to Paris and a ring, with heart-shaped tags and ribbon.

And, my new business cards just arrived! They're gorgeous, and I'm quite annoyed with myself for not having done this earlier. There are also "coupon code" cards that I send out with all purchases, containing a discount code for return customers :)

In other news, I've put one of my Etsy shops (Sodacrush) on hiatus because I just can't spare the time I need to edit listings and all that. BUT, to make up for it, I'm having a 50% sale on some of the items in my other shop, ValkyrieCouture.

Check out the new sale section here! All items at 50% (or more) off, and I'll be adding new sale items from time to time.
♥ Jasmyn
Labels: available, business cards, filigree, necklace, ValkyrieCouture
3:21 AM
Wednesday, January 4, 2012
Oxidising/Antiqing method comparison - Gilder's Paste vs. Liver of Sulphur | Go to post ➜
While on holiday in Hong Kong last year I bought a few pieces of raw brass filigree from a small shop that only sells untreated brass, so I've been trying to find a way to give them the appearance of oxidised brass without having to invest in expensive chemicals or equipment. I think I've found my solution now - in Gilder's Paste. It's a wax based pigment that can be used to permanently colour metals.
 Gilder's Paste
I'm very pleased with how fast and effective it is - as you can see below, the original raw brass is in the middle, with an attempt at Liver of Sulphur oxidising on the right, and a piece worked with Gilder's Paste on the left. Liver of Sulphur is not as effective on brass as it is on silver or copper, and only darkens the metal a little - heating the solution and leaving it in for almost an hour produced the piece on the far right, which is more defined than raw brass but nowhere near the look I was going for.
 Left: Gilder's Paste
Middle: Raw brass (untreated)
Right: Liver of Sulphur
Gilder's Paste is a bit messy to work with, though you could probably use a cloth or cotton bud to apply it, I like using my fingers. It's a fairly simple process - just pick up a small lump (it has the consistency of soft polishing wax) and rub it into the filigree piece, making sure to get it into all the recesses. Rub excess paste off with a tissue and burnish to highlight the raised portions.
 Progress shot
You could probably finish the piece with wax polish or sealant to keep the colour exactly as it is - but since I used only black paste, and want it to look as antiqued as possible, I left it alone to oxidise naturally. The finished piece doesn't actually look exactly like oxidised brass - it has greater "clarity", and looks more sharply detailed, with greater contrast between the blackened parts and the highlights.
 Contrast shot
Quite a success, all things considered - I'll probably use this on any raw brass pieces I acquire in the future. The finished piece has a sort of depth and warmth that looks absolutely lovely compared to the untreated one :)
Jewelry aside, I've been listening to the classical covers done by Aston. Utterly gorgeous soundtrack to be working to!
♥JasmynLabels: DIY, Product review
1:52 AM
Wednesday, January 4, 2012
Oxidising/Antiqing method comparison - Gilder's Paste vs. Liver of Sulphur | Go to post ➜
While on holiday in Hong Kong last year I bought a few pieces of raw brass filigree from a small shop that only sells untreated brass, so I've been trying to find a way to give them the appearance of oxidised brass without having to invest in expensive chemicals or equipment. I think I've found my solution now - in Gilder's Paste. It's a wax based pigment that can be used to permanently colour metals.
I'm very pleased with how fast and effective it is - as you can see below, the original raw brass is in the middle, with an attempt at Liver of Sulphur oxidising on the right, and a piece worked with Gilder's Paste on the left. Liver of Sulphur is not as effective on brass as it is on silver or copper, and only darkens the metal a little - heating the solution and leaving it in for almost an hour produced the piece on the far right, which is more defined than raw brass but nowhere near the look I was going for.
Gilder's Paste is a bit messy to work with, though you could probably use a cloth or cotton bud to apply it, I like using my fingers. It's a fairly simple process - just pick up a small lump (it has the consistency of soft polishing wax) and rub it into the filigree piece, making sure to get it into all the recesses. Rub excess paste off with a tissue and burnish to highlight the raised portions.
You could probably finish the piece with wax polish or sealant to keep the colour exactly as it is - but since I used only black paste, and want it to look as antiqued as possible, I left it alone to oxidise naturally. The finished piece doesn't actually look exactly like oxidised brass - it has greater "clarity", and looks more sharply detailed, with greater contrast between the blackened parts and the highlights.
Quite a success, all things considered - I'll probably use this on any raw brass pieces I acquire in the future. The finished piece has a sort of depth and warmth that looks absolutely lovely compared to the untreated one :)
Jewelry aside, I've been listening to the classical covers done by Aston. Utterly gorgeous soundtrack to be working to!
♥Jasmyn

Gilder's Paste
I'm very pleased with how fast and effective it is - as you can see below, the original raw brass is in the middle, with an attempt at Liver of Sulphur oxidising on the right, and a piece worked with Gilder's Paste on the left. Liver of Sulphur is not as effective on brass as it is on silver or copper, and only darkens the metal a little - heating the solution and leaving it in for almost an hour produced the piece on the far right, which is more defined than raw brass but nowhere near the look I was going for.

Left: Gilder's Paste
Middle: Raw brass (untreated)
Right: Liver of Sulphur
Middle: Raw brass (untreated)
Right: Liver of Sulphur
Gilder's Paste is a bit messy to work with, though you could probably use a cloth or cotton bud to apply it, I like using my fingers. It's a fairly simple process - just pick up a small lump (it has the consistency of soft polishing wax) and rub it into the filigree piece, making sure to get it into all the recesses. Rub excess paste off with a tissue and burnish to highlight the raised portions.

Progress shot
You could probably finish the piece with wax polish or sealant to keep the colour exactly as it is - but since I used only black paste, and want it to look as antiqued as possible, I left it alone to oxidise naturally. The finished piece doesn't actually look exactly like oxidised brass - it has greater "clarity", and looks more sharply detailed, with greater contrast between the blackened parts and the highlights.

Contrast shot
Quite a success, all things considered - I'll probably use this on any raw brass pieces I acquire in the future. The finished piece has a sort of depth and warmth that looks absolutely lovely compared to the untreated one :)
Jewelry aside, I've been listening to the classical covers done by Aston. Utterly gorgeous soundtrack to be working to!
♥Jasmyn
Labels: DIY, Product review
1:52 AM
Search ★
Looking for something specific? A tutorial, tip or design? Use this search box to find what you need!
Search ★
Looking for something specific? A tutorial, tip or design? Use this search box to find what you need!
About ★
Currently on HIATUS but leaving this blog up for those who are still looking at old tutorials/process shots :) Will be back one day maybe!
About ★
Currently on HIATUS but leaving this blog up for those who are still looking at old tutorials/process shots :) Will be back one day maybe!